

Sainz, L.V. (1) ; Abarca-Olivas, J. (2); González-López, P. (2)
(1) Neurosurgery Department. Hospital Universitario Fundación Jiménez Díaz (Spain)
(2) Neurosurgery Department. Hospital General Universitario de Alicante (Spain)
The transpalpebral orbitofrontal approach is a minimally invasive approach used to treat surgically frontal lobe pathology, anterior skull base, suprasellar lesions and anterior circulation pathology assisted with microscope or endoscope. It uses a natural crease in the eyelid to enter the anterior skull base under direct vision and retractionless exposure.
The key to this approach is to plan a tailored craniotomy with an adequate angle of vision that does not limit our access to the lesion.
Selection of cases
Disease of the anterior cranial fossa, suprasellar region and anterior circulation.
Preoperative imaging
Three dimensional computed tomography and MRI 3D
Check paranasal sinus anatomy, not recommended for patients with large frontal sinus with lateral extension or orbital roof involvement.
Try to identify the supraorbital bundle variant in 3D reconstruction


Fig 1 / 2 : 3D reconstruction of CT scan. Preoperative study of frontal sinus anatomy and supraorbital bundle variant
Structures approached
-Ipsilateral: Orbital roof, anterior and posterior clinoid process, basal frontal lobe, sylvian fissure, temporal pole, internal carotid artery, ophthalmic artery, posterior communicating artery, anterior choroidal artery, anterior cerebral artery (A1,A2), middle cerebral artery (M1,M2), NI, NII, NIII, NIV.
-Midline: Olfactory groove, planum sphenoidale, pituitary stalk, tuberculum sellae, chiasm, anterior communicating artery, distal basilar artery.
-Contralateral: Orbital roof, anterior and posterior clinoid process, basal frontal lobe, sylvian fissure, temporal pole, internal carotid artery, ophthalmic artery, posterior communicating artery, anterior choroidal artery, A1,A2, M1,M2, NI, NII, anterior portion of the falx.

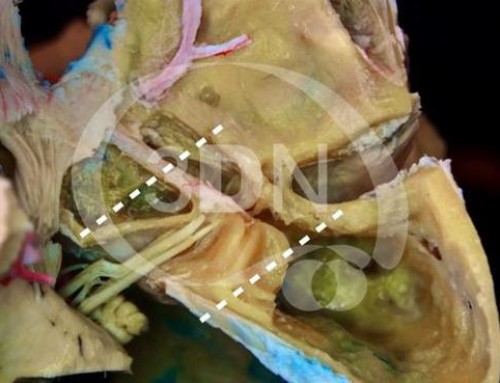
Fig 3: Anterior fossa. In orange the area under vision and areas exposed.


Fig 4 / 5: Different angles of vision in axial and sagittal 3D reconstruction.
Positioning and preparation
Head is secured with three pin fixation system. The single pin is placed in the contralateral side. In supine position, first the head must be elevated above the level of the heart approximately 15º to facilitate venous drainage. Then at least about 20◦ of retroflection for gravity self-retraction of the frontal lobe. The degree of rotation depends on the structure approached. The nasoorbital plane formed with the flat hand placed on top as seen in the figure, is the reference to achieve a good approach. For midline structures this plane has to be just horizontal. More rotation for contralateral structures and less for ipsilateral ones. Finally, lateroflection to the contralateral side is recommended in order to have an effective and comfortable position during the procedure.

Fig 6: Nasoorbital frontal plane to approach midline structures
Anatomical landmarks
Before making the skin incision, it is useful to identify the osseus landmarks such as the frontal sinus, glabella, orbital rim, supraorbital notch, zygomatic arch and thetemporal line. Other structures, as the course of the frontal branch of the facial nerve and supraorbital nerve are relevant to avoid injury.

Fig 7: Anatomical landmarks
The supraorbital nerve frequently constitutes the lateral landmark of the frontal sinus, consequently keeping lateral to it, avoids entering the sinus cavity. However there are several variants that have to be considered.
The presence of a foramen forces to keep lateral the craniotomy given that is difficult to dissect the trajectory within the frontal bone. If this constitutes a limitation in the craniotomy window leaving less than 2.5cm of horizontal width, other approaches may be considered. In approximately 70% of cases a notch or a free bundle is encountered.


Fig 8 / 9: Supraorbital bundle variants


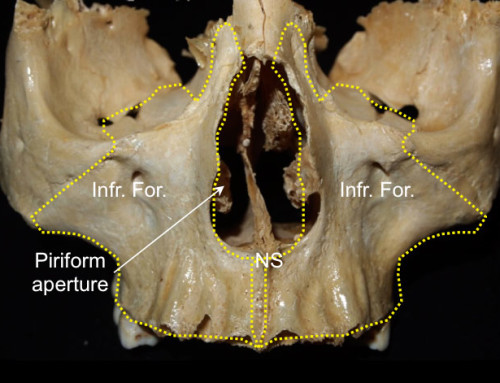
FIg 10 / 11: Evaluating the lateral extension of the frontal sinus as a constraining factor of the craniotomy window width.
Skin incision
Skin incision stays along a natural crease marked with the patient standing upright in natural gaze and awake, this corresponds approximately to 1cm above the upper lid margin. Just before the incision a margin stitch is placed to allow gentle traction to facilitate the incision.
Reaching the lateral canthus, the incision must be as horizontal as possible to avoid injury, given that the frontal branch of the facial nerve is horizontal approaching the orbital rim. It can extend laterally if needed up to 2.5cm lateral to the canthus. Beyond this point there is high risk of transgression. Medially it cannot reach the medial canthus or the nasal root since neurovascular structures become apparent. (supratrochlear and infratrochlear nerves and dorsal nasal artery).


Fig 12: Left eyelid skin incision Fig 13: Right eyelid skin incision in 3D reconstruction
Palpebral tissue dissection
In this step is critical to identify the orbital septum. After the skin plane, the orbicularis oculi muscle is encountered. It is then lifted and cut horizontally and then along the fibers medially and laterally, exposing the underlying plane: the orbital septum. The plane is further developed superiorly and laterally until the orbital rim is identified. The periostium is incised at the midpoint of the orbital rim near the frontozygomatic junction and continued superiorly following the orbital rim.


Fig 14 / 15: Palpebral tissue dissection. Identifying the orbital septum.


Fig 16 / 17: After identifying the orbital septum plane, the orbital rim is incised subperiostically.
Subperiosteal dissection
Before reaching the medial limit (supraorbital bundle) subperiosteal dissection is performed along the periosteal cut. With a dissector Nº 4 the periostium is gently detached superiorly and inferiorly exposing the bone surface along the orbital rim, separating all orbital contents covered with the orbital septum. Medially we will encounter the supraorbital bundle and dissect it off the supraorbital rim if possible.
The orbital septum must be preserved in order to avoid transgression of the periorbita. Fat tissue herniation will be present if the orbital septum is penetrated. Keeping the dissection against the bone is key to avoid this laceration. Special attention must be taken at the changing-angle of the orbital rim and the lacrimal fossa in the lateral and superior part of the roof of the orbit. This plane can be further extended posteriorly to the orbital apex without entering the superior orbital fissure.

Fig 18: Changing angle in the subperiosteal dissection.
The frontal periosteum is elevated superiorly beginning from the lateral part of the orbital rim towards the medial limit, the supraorbital bundle, already identified. Laterally, towards the temporal area, dissection is kept in the subperiosteal plane again taking care of the angle of dissection to preserve the frontal branch of the facial nerve within the fat pad.


Fig 19 / 20: The orbital rim and the supraorbital bundle (in this case a foramen).
Craniotomy and osteotomies
Just behind the frontozygomatic junction a spheno-orbital burr hole is made at the frontosphenoidal suture to expose both periorbita and the frontal dura. Preplating with 3 low profile plates is useful for optimal cosmetic result.

Fig 21: 3D view of the craniotomy window.
A sequence of four cuts are necessary to complete the fronto-orbital craniotomy:
-The first cut begins at the frontal portion the spheno-orbital burr hole towards the frontal bone medially defining the upper limit of the craniotomy until the medial limit, lateral to the supraorbital bundle.
-The second cut continues to the medial frontal limit, lateral to the supraorbital bundle, through the orbital rim to the orbital roof posteriorly.
-The third cut is performed from the orbital portion of the spheno-orbital burr hole through the frontal process of the zygomatic bone.
-The fourth cut extends from the posterior part of the second cut laterally to reach the posterior end of the third one.

Fig 22: Different views of the burr hole and osteotomies.
After the cuts the bone flap is elevated and the dura is exposed. Dynamic retractors and a malleable retractor blade is used along the craniotomy to protect orbital contents and the skin. The dimensions are approximately of 3cm wide by 2.5 cm of height and another 2 cm of orbital roof. Rubber band hooks or other permanent retractors are placed for further steps retracting upwards.


Fig 23 / 24: Bone flap craniotomy.
Extradural corridor widening
After removal of the bone flap, high speed drilling is used to lower the irregular cranial surface of the residual orbital roof and planum sphenoidale, before opening the dura. This maneuver provides extra space, key in following steps.


Fig 25 / 26: Irregular orbital roof cranial surface drilling.
If the frontal sinus has been opened, obliteration and repair must be undertaken. Mucosa must be pushed further to the sinus cavity. Fat tissue, fascia graft or bone wax is used to obliterate the porus and the pericranial graft is placed on top to seal it combined with fibrin glue. At this stage a couple of small holes in the anterior part of the superior temporal line and the zygomatic process of the frontal bone are made to suture back the temporal muscle in the closure.
Dura opening
The dura is opened in semicircular C fashion with the base towards the periorbita. Two tenting sutures on the dura base are used to reflect the flap without giving significant retraction. The drilling made in the extradural step gives a natural window and direct vision on the anterior base plane without significant retraction on the frontal lobe.

Fig 27: C shape dura opening.
Intradural dissection
Large cottonoids are placed over the frontal lobe surface and gentle and dynamic retraction is applied. Cistern opening and CSF release is essential to avoid retraction. Ipsilateral carotid cistern is opened beginning at the carotid optic triangle. The medial part of the sylvian fissure is also frequently opened to release more CSF. After this maneuver both optic nerves, chiasm and the suprasellar region are exposed easily. The supraclinoid carotid bifurcates in the anterior (A1 segment) and middle cerebral arteries (M1 segment).


Fig 28 / 29: Chiasm, carotid and proximal sylvian cisterns are opened and dissected.
Rotating the angle of view ipsilaterally, the proximal sylvian fissure is dissected from medial to lateral and the MCA bifurcation and branches are exposed. This direction is less traumatic than the lateral to medial dissection from a pterional approach.


Fig 30 / 31: Sylvian fissure with M2 branches.
Towards the midline, the anterior part of the falx and the draining frontal veins entering the superior sagital sinus are visualized.


Fig 32 / 33: Falx and anterior frontal lobe draining veins.
Closure
The dura is closed in a watertight fashion with 4-0 vycril or silk sutures. The bone flap is replaced with two or three titanium low profile plates or a burr hole titanium plate, keeping the flap medial and frontal to the edges for adequate cosmetic result. The temporal bone is reattached to the frontozygomatic junction. Closure of the soft tissue is performed in three layers. First, the periostium-periorbita avoiding residual exposure of the bone. Then the orbicularis muscle lawyer specially lateral over the frontozygomatic junction. A 3-0 or 4-0 braided absorbable suture are used for these two layers. Tissue may approximate naturally without tension. And finally, the skin with a 6-0 subcuticular running suture.
Case report
The clinical case is based on a 63 year old woman on follow up after parietal meningioma surgical treatment in 2004. In control image studies an orbital roof meningioma is detected. Initially, conservative treatment was achieved since the lesion was small and produced no symptoms. Finally surgical treatment was recommended after increased growth was detected on a year basis from 9 to 14mm.


Fig 34 / 35 / 36: Preop and postoperative images in the three planes.
Complications
One relative limitation of the transpalpebral minicraniotomy is the need to traverse the frontal sinus in some patients and the attendant risk of increasing frontal sinusitis andmucocele formation. To minimize this risk, a mucosal sparing technique is important especially in the region of the frontal sinus outflow tract. None of the patients in this series developed frontal sinusitis or mucocele but a longer-term follow up is needed.
Other potential complications include superficial skin abrasion along the brow from retractors. These are preventable by cushioning the soft tissue retractors with moist gauze. When superficial abrasions occur, they should be kept clean and well moisturized with ointments to allow excellent reepithelialization.
The transpalpebral minicraniotomy approach is a safe, direct and minimally disruptive approach to the anterior cranial vault and should be considered as an alternative to more extensive craniofacial approaches for select pathology of the anterior cranial vault 1).


Follow us