

Portugués Vegara MJ. (1), González López P. (1), Abarca Olivas J. (1), Lloret Garcia J. (1,2)
Laboratory assistant: Sanchez de la Blanca Mesas A.(2)
(1)Department of Neurosurgery, Hospital General Universitario Alicante.
(2)Laboratory of Neuroanatomy, Universidad Miguel Hernández de Alicante. Alicante, Spain.
Step 1: Skin
Step 1a
This picture shows a superior view in surgical position of the relationship between the coronal suture and sagittal line with the classical horse-shoe skin incision. In addittion to this incision, different alternatives might be performed as a transverse curvilinear line 1 cm in front of the coronal suture which crosses the midline. Another more extensive surgical field is gained by performing a combined pterional and anterior interhemispheric approach to remove lesions occupying the supra- and parasellar spaces and the third ventricle, as certain types of craneopharyngiomas do.
Step 1b
The skin flap must be always reflected towards the vascularization line in order to keep its feeding. In this case we are showing the way in which the pericranium has been preserved just in case a dural defect requires a reconstruction.
Step 1c
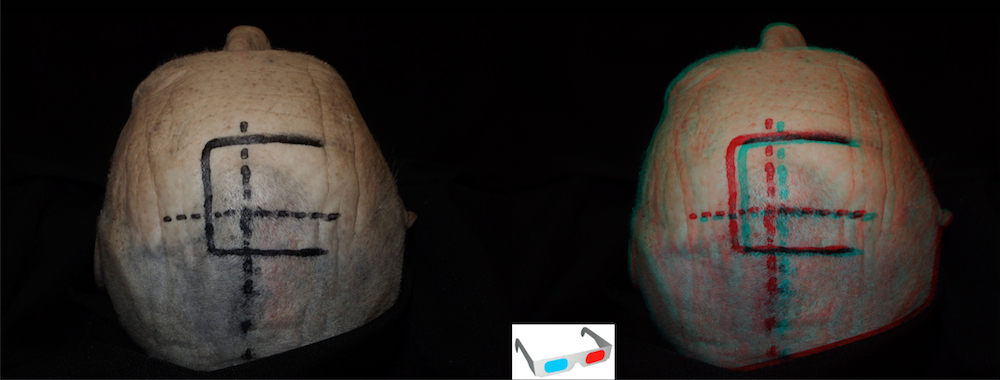
Inverted U with the top just 1 cm left of midline is shown extending from 3,5 cm anterior to the coronal suture to 1,5 cm behind. Different authors prefer to place the craniotomy attending to different individual anatomical features as the location of the veins draining into the superior sagittal sinus.

Step 1d
In this picture a clear display of the underlying bone surface is shown. The relative positions of the coronal (CS) and superior sagittal (SS) sutures are exposed, slightly posterior and lateral to the center of the craniotomy respectively. Generally a cortical region free of veins draining into the superior sagittal sinus is uncovered at this level. CB: Bregma; CS: Coronal suture; SS: Sagital suture.

Step 2: Craniotomy
Step 2a
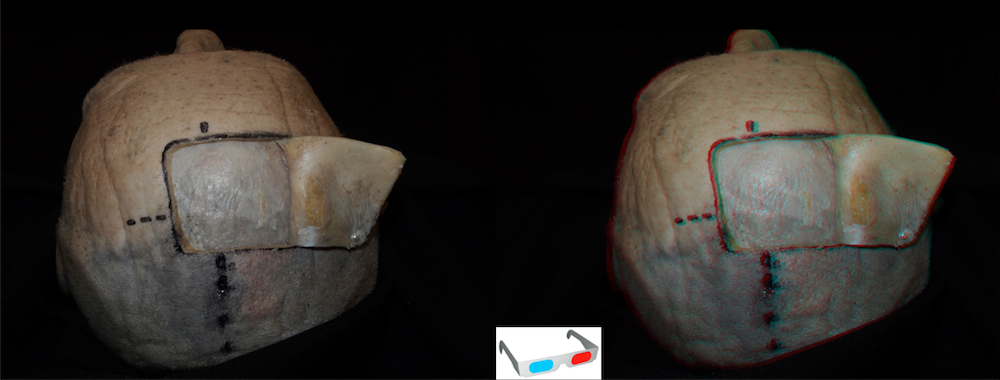
Classically, the craniotomy is placed two-thirds in front and one-third behind the coronal suture. With the aim of exposing the superior sagittal sinus, two burr over this structure and a longitudinal cut on the left of the midline are performed. Although it is obviously more risky to perform the midline craniotomy line over the superior sagittal sinus, some authors prefer to proceed in this fashion.

Step 3: Dural stage
Step 3a
The superior sagittal sinus has been highligthed with the aim of showing its theoretical trajectory between the dural layers just on the top of the interhemispheric fissure.
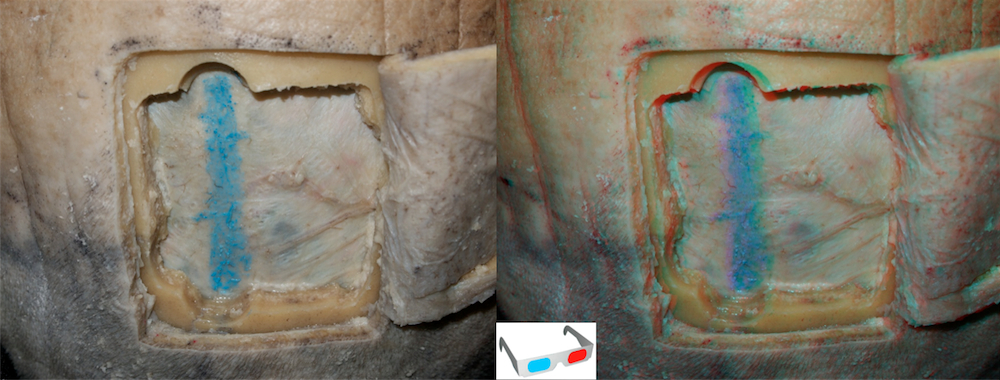
Step 3b
The superior sagittal sinus has been highligthed with the aim of showing its theoretical trajectory between the dural layers just on the top of the interhemispheric fissure.
The dura mater is opened and reflected with its base toward the sinus. Special care must be taken with the dissection of the bridging veins.
Step 4: Interhemispheric dissection
Anatomical review
The position of the bone flap takes advantage of the fact that in most hemispheres, there exists an area relatively devoid of major draining veins just in front of the coronal suture. MFV: Middle frontal vein; PFV: Posterior frontal vein; Yellow box: theorethical area of approach; Black line: Coronal suture.

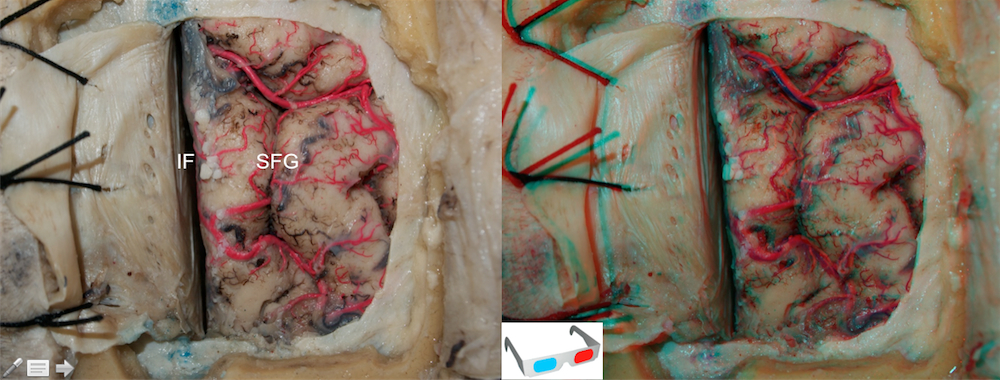
In this image, we show the point at the upper edge of the crack interhemispheric in which entry is made in it, displacing medially superior frontal gyrus. Among the vascular extraventricular structures, the direct confrontation with the cortical veins draining in the superior sagittal sinus and the callosomarginal and pericallosal arteries represents the main challenge. Among the neural structures, excessive retraction over the medial and superior frontal gyri has been correlated in further studies with transient hemiparesis due to the supplementary motor area injury, and this is why we aim for avoiding this maneuver. The lack of anterior falx in the depth of the fissure may produce in certain cases the herniation of the anterior portion of the cingulate gyri, inducing confusion between the cingulate gyrus and the corpus callosum, and the consequent danger of injuring this limbic loop structure.

The cingulated gyrus and the superior frontal gyrus have been partially removed in order to expose the anatomy Note the callosomarginal artery, pericallosal artery and pericallosal plexus. CM: callosomarginal artery; FX: Falx; PC: pericallosal artery;; PCP: pericallosal plexum.

Step 4a
Is very important to locate a entry point in the fissure free of draining veins from the superior sagittal sinus. Initially we did not have a major distraction, as opening the pericallosal cistern CSF extract enough to allow a good access to the structures of the midline without using self-retaining retractors. Some authors argue for interhemispheric dissection without the use of retractors.

Step 5: Transcallosal stage
Step 5a
After mobilization of the frontal lobe and the falx cerebri, the interhemispheric fissure is approached. The cingulated gyrus is carefully retracted on both sides before exposing the corpus callosum and pericallosal arteries.

Step 5b
Anatomical dissection of the interhemispheric fissure. A magnified view of the body of the corpus callosum and both pericallosal arteries after separating both cigulate gyri. The anterior half of the body of the callosum represents the point where the callosal incision should be ideally placed in order to achieve the anterior portion of the lateral ventricle, so this is the reason why we centered our dissections at this level. The anterior half of the body is the region with the smallest cross-sectional areas adjusted per length. This region also shows, not only the lowest total amount of fibers, but also the lowest fiber densities.

Step 5c
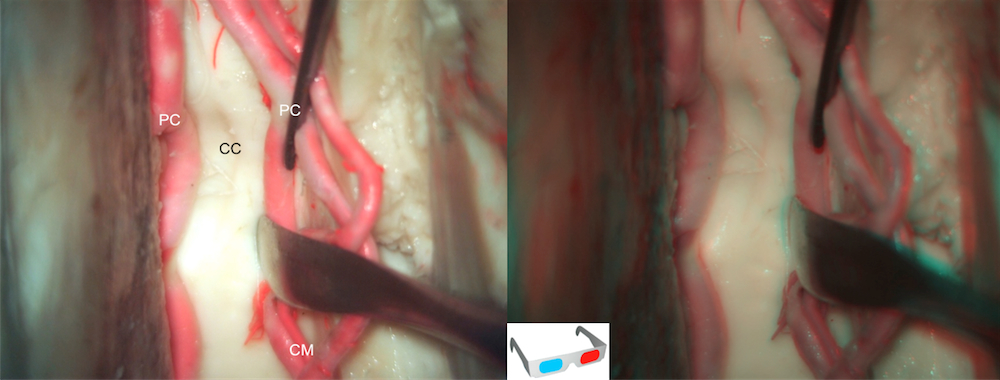
With further dissection whitin the interhemisferic fissure, the corpus callosum is approached. Note the mobilized arteries and the groove on the surface of the corpus callosum made by arterial contact. CC: corpus callosum; CM: callosomarginal artery; PC: pericallosal artery;
Step 5d
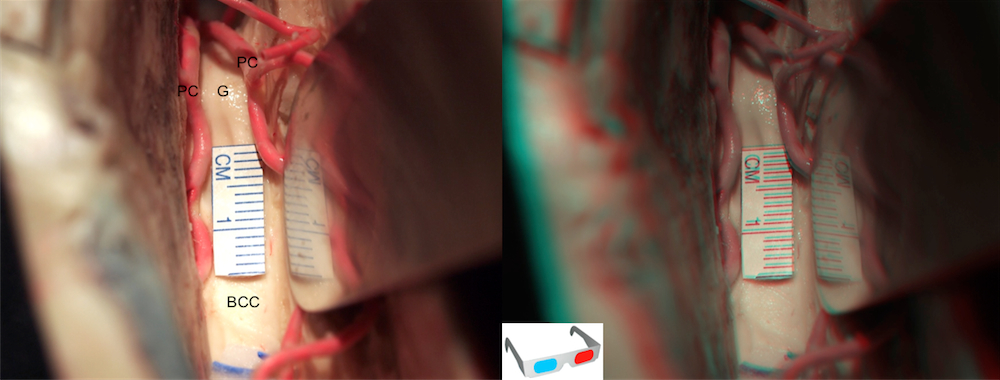
Attending to the callosotomy location in the transverse axis, some authors advocate a midline callosal entry between both pericallosal arteries, pointing this as the most avascular point in the superior surface of the corpus callosum. After the identification of pericallosal arteries and corpus callosum surface, the callosotomy in then entered between the arteries in the anterior portion of corpus callosum. The callosal incision and its presumed clinical translation represent the main criticism point for this operative approach. An approximately 1.5 cm incision allows a safe approach to most of the lesions. BCC: body of the cospus callosum; G: genu of the corpus callosum; PC: pericallosal artery.
Step 5e
Our surgical technique consists on creating an oval entry point through the superior surface of the corpus callosum. The main axis of this oval-shaped fenestration must be initially performed in a longitudinal direction, and although contemporary authors have reported 20-30 mm lengths, 8-10 mm might be enough, because during surgery itself, extra space in the transverse axis is progressively gained through the deep surgical maneuvers and changes in the angulation

Step 6: Intraventricular stage
Step 6a
Once the callosum is opened, a view of the lateral ventricle is offered. A technical advantage this approach provides is the fact that both lateral ventricles and foramens of Monro can be achieved through a single callosal incision after opening the septum pellucidum. This maneuver is not possible when a transcortical corridor has been taken due to its more oblique direction. Once the intraventricular neurovascular structures are exposed, the risk of damaging them will be directly dependent of the intraventricular strategy chosen (transforaminal, interforniceal, subchoroidal or transchoroidal), and the tumor location. CP: choroid plexus on the body of the lateral ventricle; F: falx; FM: foramen of Monro; PC: pericallosal arteries; SP: septum pellucidum.

Anatomical review
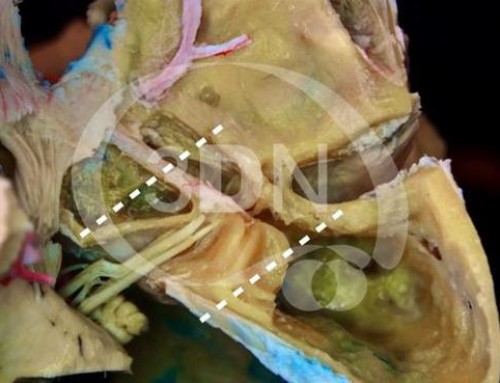
Anatomic overview of the anterior transcallosal approach. The retractor has been placed simulating the surgical trayectory. Note the relationship between the genu of corpus callosum and the foramen of monro. CG: Cingulated gyrus; F: Falx; G: Genu of the corpus callosum.

Anatomy of the floor of lateral ventricle CN: Caudate nucleus; CP: Choroidal plexus; FM: Foramen of Monro; R: Rostrum of corpus callosum; Th: Thalamus.

Step 6b
Microscopic view of the floor of the lateral ventricle. Ventricular veins must be recognized. Acv: anterior caudate vein; SCv: Superior choroidal vein; Sv: Septal vein.; TSv: Thalamoestriate vein.


Follow us